 |
|
More Related Stories |
| Page (1) of 1 - 08/03/06 |
|
Something along these lines.
Preparation
This tutorial will involve the creation of two separate images. The first is, of course, the fabric object to which you want to apply the billowing effect--in my case, a flag. The second is an image that will be used as a displacement map. You won't need anything else (except a little skill and a copy of Photoshop--pretty much any version) to complete this tutorial.
The main (flag) image
Presumably you already have a flag or piece of fabric that you've created in Photoshop. It's beyond the scope of this article to get into the creation of a graphic element like that.
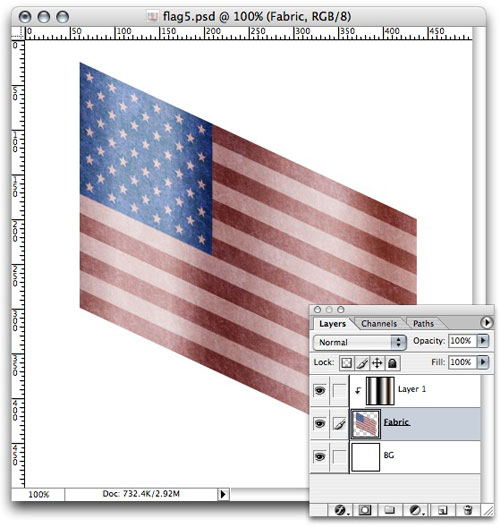
Here's the base element Ill be using, which I created in Photoshop for this purpose. It's basically just a rectangle with a little texturing and some stars and stripes composited onto it.
Whatever type of element you're using, there are two things you need to keep in mind:
1. Make certain that the flag (or fabric) object consists of a single layer with no layer effects applied to it. If you're using multiple layers, merge them into a single layer. (But don't flatten the image.) If you have layer effects applied, rasterize them (Layer > Layer Style > Create Layers), and then merge the resulting layers together.
2. You need to create space on your canvas around your flag. If any part of the flag is touching the edge of the canvas when you apply the displacement effect, it will look terrible. So maybe make your canvas twice the size of the flag object you're using, and center the flag in the canvas, as in m example above. (I happen to have a white background on a separate layer to make it easier for you to see.)
The displacement image
Now we'll create the image that will be used for displacement, trying to keep it as simple as possible for now.
To begin, create a new document that's about twice the dimensions of your flag image. You need lots of room to wrk with in order to pull off this effect. If the displacement image is too small, you'll get poor results in the end. So make it nice and large.
In my case, the flag n my image is 415 x 249 pixels. I'm making my displacement image 830 x 830.
Now, for the first attempt at displacement, we're simply going to use a gradient map. (We'll look at more complex displacement maps in the second part of this tutorial.) To create a gradient map in your displacement image, choose Layer > New Fill Layer > Gradient Fill.
This dialog will pop up.
To create a custom gradient, click on the currently selected gradient--not the pul-down menu, but the picture of the gradient itself. That will call up the Gradient Editor dialog.
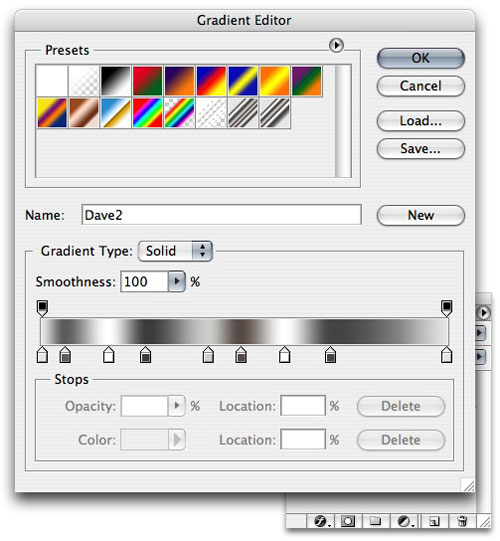
Now you can add stops and shift around colors in order to make something like this.
Essentially you want to create an undulating pattern of blacks, whites and grays. This is what will be used to create the ripples--or "billowing"--in the flag image. Keep the undulations fairly tight, but space them a bit unevenly.
If you need help working with the Gradient Editor, I have a separate tutorial on that, which you can read by clicking here.
Here's my resulting gradient image. Feel free to try variations on this to achieve the results you want.
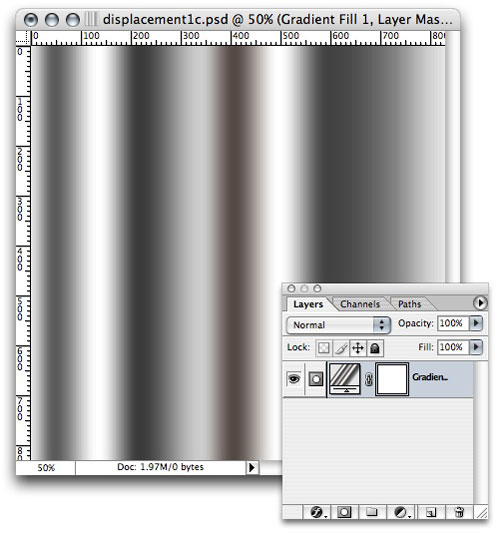
Now save your gradient image. It's critical that, whenever you apply the displacement effect to your flag, you have the currently saved version of your gradient available to you. If you make changes to the gradient and attempt to apply a new displacement, the changes will not be seen in the displacement until the changes to the gradient have been saved.
Got that?
You will.
Compositing the gradient
Now, before we get to the actual displacement/billowing of the flag, we're going to do a little compositing trick. This will help add shadows and highlights to the billows in the material, thus making a ore convincing effect.
In your displacement image, select all. Then type Shift-Command-C (Mac) or Shift-Control-C (Windows) to copy the pixels in your displacement image. (A regular copy won't work right for this purpose. You need to hold down the Shift key.)
Now go over to your flag image, and paste in the pixels (Command-V).
Now go over to your flag image and paste the gradient onto a new layer directly above the flag layer.
Then, with the gradient layer selected, choose Layer > Create Clipping Mask (or something similar to that, depending on your version of Photoshop).
This happens.
Now go to the Layers palette and set the gradient layer's Blend Mode to "Soft Light."
Neat.
You can increase or decrease the brightness/contrast of the gradient layer to affect the strength of the highlights and shadows you've created, if desired.
And voila!
Now we're almost ready for the displacement.
Skewing the flag
Now, you might want to put your flag at a slight angle when you create this effect to simulate the look of a flag hanging from a pole.
To do this, select your flag layer in the Layers palette. Then choose Edit > Free Transform.
For my example, I'll set the H skew to 25 and then set the rotation to 25 degrees to match it. (You can set these values numerically up in the top Tool Options bar.)
Now aren't you glad you made your canvas so big?
All right. Now we're ready to displace.
The final displacement effect
And now, at last, we arrive at the displacement. To apply this effect, choose Filter > Distort > Displace.
A filter dialog will pop up. For starters, use these settings. (Definitely use "Tile," rather than "Scale.")
After you hit "OK," a new dialog will pop up asking you to select your displacement map. Choose the gradient image you created earlier.
And here's the result.

Now you can go back to your gradient image and experiment with different gradients to get exactly the look you're after. Here's a version with variations on the gradient map, the shading and the vertical value used in the Displace filter.
Next time around, we'll look at methods for adding in more complex undulations, including horizontal and diagonal ripples. If you have any questions in the meantime, be sure to visit me in the Adobe Photoshop forum at DMN Forums by clicking here.
 If you liked this article
click here to recommend it.
Page: 1
If you liked this article
click here to recommend it.
Page: 1
Related Sites: Creative Mac , Digital Producer , Audio Video Producer , Corporate Media News , Digital Media Designer , Oceania , MacDesignPro
Related Newsletter: DMN Newsletter , Pixels Newsletter , Mac Alert Newsletter , Digital Media Net , DMNForums , Tutorial Finder
To Comment on This Article, Click HERE
Most Recent Reader Comments:
Click Here To Read All Posts
Must be Registered to Respond (Free Registration!!!, CLICK HERE)
Digital favorites
- Casino Online Non Aams
- Betting Sites UK
- Casino UK Sites
- Casino Online Non Aams
- Casino Non Aams
- Casinos Not On Gamstop
- UK Online Casinos Not On Gamstop
- Meilleur Casino En Ligne
- Crypto Casinos
- Casino Online Italia
- Migliori Giochi Casino Online
- Meilleur Casino En Ligne Français
- Casino En Ligne
- Meilleur Casino En Ligne Francais
- Siti Scommesse Non Aams
- Siti Poker Online Migliori
- Meilleur Site De Poker
- Site De Paris Sportif Nouveau
- Sweet Bonanza Fruits Avis
- Parier Sur Ufc
- Fm카지노 가입코드
- 비트코인 스포츠베팅
- Casino Jeux En Ligne
- Sites De Paris Sportifs
- Casino En Ligne Argent Réel
- Cresus Casino Avis
- Migliore Casino Non Aams
- Meilleur Casino En Ligne
- Meilleur Casino En Ligne 2026
- Casino En Ligne Fiable
- Casino En Ligne
- Migliori Casino Crypto
- Bonus Free Spin Senza Deposito
- Casino Online Non Aams Sicuri
- Migliori Siti Scommesse Non Aams
- Meilleur Casino En Ligne De France
- Casino En Ligne
- Casino En Ligne Fiable
- Trusted Online Casino Malaysia
- Nouveau Casino En Ligne 2026
- オンラインポーカー
- Casino En Ligne Cashlib
Source:Digital Media Online.
All Rights Reserved


