 |
|
More Related Stories |
| Page (1) of 1 - 09/05/06 |
|
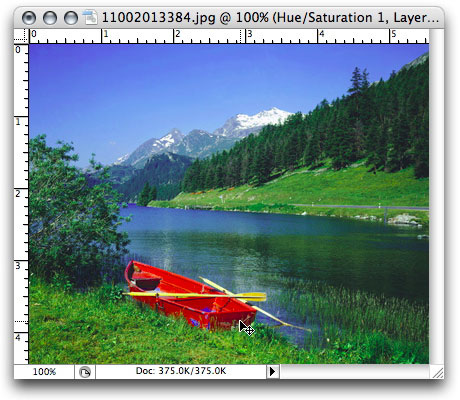
For this example, I'm using an image that's simple in one way and complex in another. I want to desaturate everything but the red boat, and in this image, it's the only red element, which makes it simple. But in this image, there's grass and other obstacles that could make masking a tremendous chore.
However, with Hue/Saturation, this becomes a simple process.
Step 1: Adjustment layer
To begin, choose Layer > New Adjustment Layer > Hue/Saturation. I prefer this method because using an adjustment layer means that the effects you apply remain editable, so you won't accidentally destroy a wedding photo or some other valuable piece of personal history. In the first dialog that pops up, choose whether you want to clip this adjustment layer using the previous layer (usually not when working with photos, but it shouldn't matter either way at this stage), and click OK.
If you prefer not to use adjustment layers for whatever reason, choose Image > Adjustments > Hue/Saturation instead. This will work the same as an adjustment layer, but the effect won't be editable later on.
Either way, at this point you will be presented with the Hue/Saturation dialog.
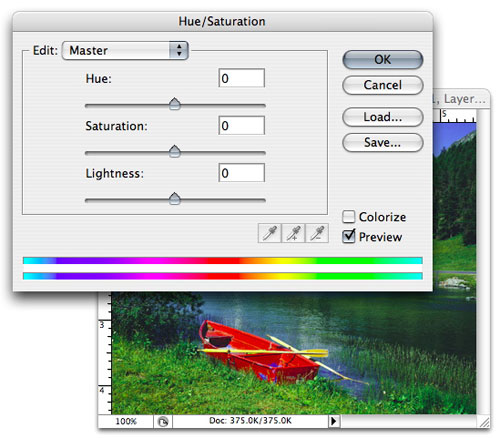
Step 2: Desaturating the master
When the dialog first opens, you'll be presented with options for adjusting hue, saturation and lightness. There's also a pull-down at the top of the dialog that's currently set to "Master." This is what we want to adjust first.
In the Saturation field, plug in a value of -99. (It's crucial for this effect that you not use -100. You'll see why in the next step.) Plugging in a value of -99 desaturates the image for all practical purposes.
But you're not done yet. There's one step left.
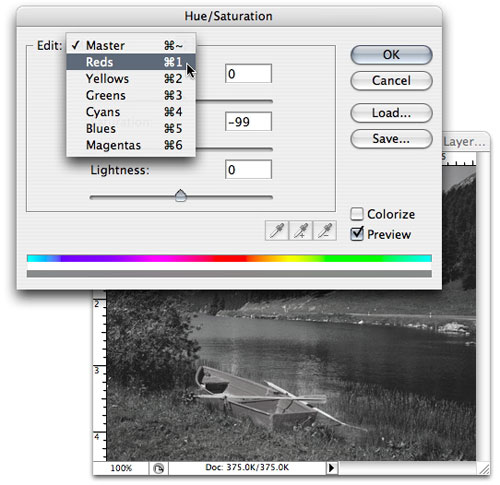
Step 3: Resaturating the reds
Now, up in the top pull-down menu, choose "Reds" from the list of available color channels to edit.
And in the Saturation field, type +100.
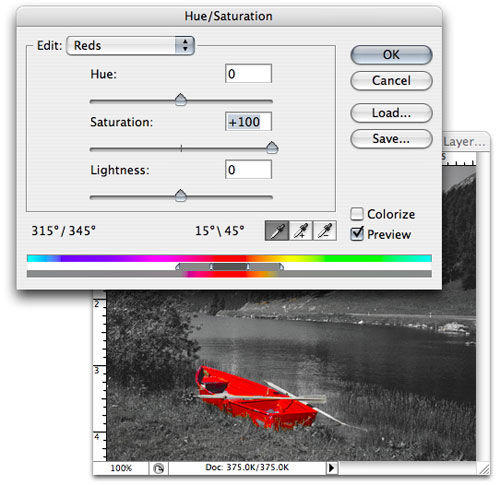
And voila!
Now, admittedly, I got a bit lucky with this particular photo. There are times when you'd want to use this process on a color not listed in the pul-down menu. But that's no problem either because Hue/Saturation can add new channels to the list for you. To do this, just choose a color channel, like red, and then click on the little eyedropper in the dialog.
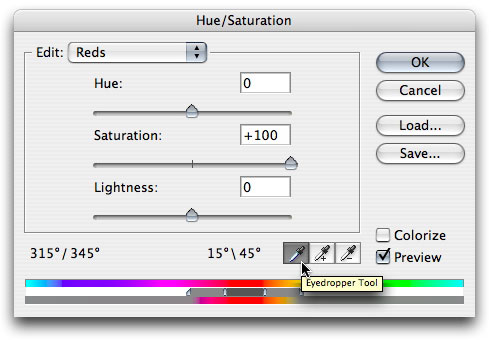
Then click on the element in your image you want to keep saturated. You'll then be editing only that particular color range.
Nw you can go in and easily clean up and stray elements in your image that have remained saturated through this process by selecting them with the Marquee tool and choosing Image > Adjustments > Desaturate.
Next time around we'll take a look at what happens when you try to use Hue/Saturation in an image in which colors overlap. Then we'll take a look at a simple technique for tinting the gray portions of the image to bring in even more of a sense of nostalgia. If you have any questions in the meantime--on this or other Photoshop subjects--be sure to visit the Adobe Photoshop forum at DMN Forums by clicking here: http://www.dmnforums.com/cgi-bin/displaywwugindex.fcgi?forum=adobe_photoshop.
 If you liked this article
click here to recommend it.
Page: 1
If you liked this article
click here to recommend it.
Page: 1
Related Sites: Creative Mac , Digital Producer , Audio Video Producer , Corporate Media News , Digital Media Designer , Oceania , MacDesignPro
Related Newsletter: DMN Newsletter , Pixels Newsletter , Mac Alert Newsletter , Digital Media Net , DMNForums , Tutorial Finder
To Comment on This Article, Click HERE
Most Recent Reader Comments:
Click Here To Read All Posts
Must be Registered to Respond (Free Registration!!!, CLICK HERE)
Digital favorites
- Casino Online Non Aams
- Betting Sites UK
- Casino UK Sites
- Casino Online Non Aams
- Casino Non Aams
- Casinos Not On Gamstop
- UK Online Casinos Not On Gamstop
- Meilleur Casino En Ligne
- Crypto Casinos
- Casino Online Italia
- Migliori Giochi Casino Online
- Meilleur Casino En Ligne Français
- Casino En Ligne
- Meilleur Casino En Ligne Francais
- Siti Scommesse Non Aams
- Siti Poker Online Migliori
- Meilleur Site De Poker
- Site De Paris Sportif Nouveau
- Sweet Bonanza Fruits Avis
- Parier Sur Ufc
- Fm카지노 가입코드
- 비트코인 스포츠베팅
- Casino Jeux En Ligne
- Sites De Paris Sportifs
- Casino En Ligne Argent Réel
- Cresus Casino Avis
- Migliore Casino Non Aams
- Meilleur Casino En Ligne
- Meilleur Casino En Ligne 2026
- Casino En Ligne Fiable
- Casino En Ligne
- Migliori Casino Crypto
- Bonus Free Spin Senza Deposito
- Casino Online Non Aams Sicuri
- Migliori Siti Scommesse Non Aams
- Meilleur Casino En Ligne De France
- Casino En Ligne
- Casino En Ligne Fiable
- Trusted Online Casino Malaysia
- Nouveau Casino En Ligne 2026
- オンラインポーカー
- Casino En Ligne Cashlib
Source:Digital Media Online.
All Rights Reserved


