 |
|
More Related Stories |
 |

From: $623 to $1,251  |
|
ADOBE LA FULL AFTER EFFECTS PB 7 MAC RETAIL ENG 1U
Animate your ideas.
From: $635 to $1,251 |
|
Adobe AFTER EFFECTS STD 7 WIN UPG ENG STD-STD 1U
The industry standard for motion graphics and visu...
From: $176 to $246 |
| Page (1) of 2 - 09/21/06 |
|
If you were with me for the last installment, you're already hip to the palpable excitement in the air that has already worked its way into a fever pitch. Today we're going to--wait for it--take the content we made last time in After Effects and put it all together in Flash. I, for one, can't wait, so let's get this party started.
If you recall from last time (available here if you don't), we made three items in After Effects: two FLV files (a looping background and a masked clip from Night of the Living Dead) and one SWF file (a spinning text animation that simply proclaimed, "Zombies!"). The idea was to take all of this After Effects-generated content and assemble it in Flash, which would yield the following masterpiece of interactivity (fig. 1):
Figure 1 (click to play)
Excitement abounds, does it not? But I digress. We need to fire up Flash and get all this stuff put together. If you want to download the pieces and follow along, you're certainly welcome to do so:
- Download the project files (454 KB, ZIP archive)
Ready? Good. The first step once Flash is running is to make a new Flash Document (Control+N on Windows or Command+N on the Mac and select Flash Document) and set the dimensions to 450x150 at 30fps with a black background (fig. 2). Also, make sure the target player is Flash 8, as we'll be adding a couple of things that are only supported in Flash 8.
Figure 2
Now, I'm a neat freak when it comes to Flash projects, so the next step would be to indulge my by making several layers in the first frame of the main Timeline, as shown in Figure 3:
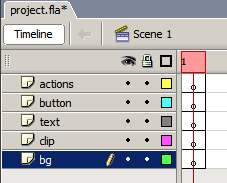
Figure 3
We've got (from the bottom up) layers for the background, the video clip, the rotating text, the button that will start the clip and text playing, and one for the ActionScript. And while I'm in anal retentive mode, I must insist that we put a stop action in our actions layer. So, click in frame 1 of the actions layer, head to the Actions panel (F9 if it's not already open) and type the following:
stop();
With that out of the way, let's go about the task of importing the clips we made in After Effects. I'm all about picking the low-hanging fruit first, so let's take care of the easiest one and bring in our spinning "Zombies!" text. Select the Import to Library command (File:Import:Import to Library) and navigate to wherever you downloaded the text.swf file to (after you've unzipped it, of course). Once you've selected the file, it will show up in the Library as text_swf, along with several graphic symbols that represent the individual letters (fig. 4).
Figure 4
Now, this step is entirely optional, but as I like to do a bit of housecleaning to ward off a bad case of Library stank, feel free to rename the letter symbols and place them in a folder (fig. 5) as I've so obsessive compulsively done. At the very least, rename your text.swf Movie Clip to a more Flash-appropriate text_mc.
Figure 5
We have to perform a bit of surgery on our newly-renamed text_mc Movie Clip to make it ready for this particular project, so double-click on text_mc in the Library to open the text_mc Timeline. If you scroll across the Timeline, you'll notice that you have 150 keyframes of exciting Zombie text action (fig. 6). Neat-o.
Figure 6
Anyway, rename Layer 1 to text, and create a new layer and name that actions. Put a stop(); action in frame 1 of the actions layer like we did on the main timeline, then scroll out to frame 150, add a keyframe there (F6), and add another stop(); in the new keyframe. Once all that is done, your Timeline for the text_mc symbol should look something like Figure 7.
Figure 7: I've split this view in half so you can see the action at the first and last frames of the sequence.
The last thing to do before we move on is to head back up to the main Timeline (click "Scene 1" in the Timeline window to get there), select the text layer, and drag an instance of the text_mc Movie Clip to the Stage. Make sure the registration point is sitting at the very top of the Stage and about a third of the way over (fig. 8, left), which translates to an x coordinate of 185 and a y coordinate of 56 when the symbol position grid is set to top left (fig. 8, center). The last thing to do here is to head for the Properties panel and assign this instance of the Symbol the highly inventive name of "text_mc" (fig. 8, right).

Figure 8
One down, two to go. Let's work on the background. Select frame 1 in the bg layer on the main timeline, and then Select File:Import:Import Video from the menu bar to start the FLV import wizard. From there, follow the sequence outlined in Figures 9-11 to get the video into the project:
Figure 9: Adjust your path to match where your file is, of course, but the file in question here is bg.flv.
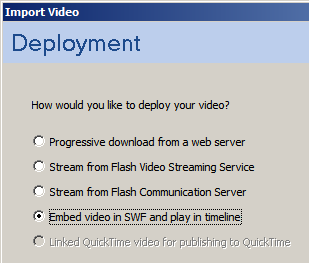
Figure 10: We definitely want to embed the video inside the Flash movie.
Figure 11: Make it a Movie Clip, place it on the stage, and expand the timeline.
Related Sites: Creative Mac , Digital Producer , Digital Webcast , Digital Animators , Animation Artist , Siggraph News , Audio Video Producer , Corporate Media News , Digital Game Developer , Digital Media Designer , Oceania , MacAnimationPro , MacDesignPro , Test Site , After Effects , Webcast (BN) , Flash
Related Newsletter: DMN Newsletter , CMN Newsletter , Pixels Newsletter , Levels Newsletter , Mac Alert Newsletter , Renders , Streamline Newsletter , Digital Media Net , DMNForums , Tutorial Finder
To Comment on This Article, Click HERE
Most Recent Reader Comments:
Click Here To Read All Posts
Must be Registered to Respond (Free Registration!!!, CLICK HERE)
Digital favorites
- Casino Online Non Aams
- Betting Sites UK
- Casino UK Sites
- Casino Online Non Aams
- Casino Non Aams
- Casinos Not On Gamstop
- UK Online Casinos Not On Gamstop
- Meilleur Casino En Ligne
- Crypto Casinos
- Casino Online Italia
- Migliori Giochi Casino Online
- Meilleur Casino En Ligne Français
- Casino En Ligne
- Meilleur Casino En Ligne Francais
- Siti Scommesse Non Aams
- Siti Poker Online Migliori
- Meilleur Site De Poker
- Site De Paris Sportif Nouveau
- Sweet Bonanza Fruits Avis
- Parier Sur Ufc
- Fm카지노 가입코드
- 비트코인 스포츠베팅
- Casino Jeux En Ligne
- Sites De Paris Sportifs
- Casino En Ligne Argent Réel
- Cresus Casino Avis
- Migliore Casino Non Aams
- Meilleur Casino En Ligne
- Meilleur Casino En Ligne 2026
- Casino En Ligne Fiable
- Casino En Ligne
- Migliori Casino Crypto
- Bonus Free Spin Senza Deposito
- Casino Online Non Aams Sicuri
- Migliori Siti Scommesse Non Aams
- Meilleur Casino En Ligne De France
- Casino En Ligne
- Casino En Ligne Fiable
- Trusted Online Casino Malaysia
- Nouveau Casino En Ligne 2026
- オンラインポーカー
- Casino En Ligne Cashlib


 (Rated by 7 users)


